
+(2).jpg)
.jpg)
I was wanting/needing two small chandeliers to hang from my two gazebos in my backyard for a upcoming party...so whats a girl to do but make them herself~ I was extremely lucky to pick up this large chandelier at a tag sale for $5 bucks (seen in the before photo) The after photo shows just one of the two chandeliers I've made....not to bad if I do say so myself! Anywho.... here is how I did it if anyone is wanting to make their own chandelier.
Firstly, your needing crystals from a thrifted chandelier... or you could use those long strings of beaded garlands that are so popular around Christmas time. I could imagine this made with white pearls...hmmm, now I'm wanting one of those! I pulled off all of the crystals from this chandelier.....+(2).jpg) then I took the brass frame outside and started pounding apart the rings with the predrilled holes in them that I wanted to reuse on my two new chandeliers. Here are those parts shown below. I cut open the old metal circles so that I could make them smaller. I simply wrapped wire to secure the ends together to keep the new/smaller circle shapes.
then I took the brass frame outside and started pounding apart the rings with the predrilled holes in them that I wanted to reuse on my two new chandeliers. Here are those parts shown below. I cut open the old metal circles so that I could make them smaller. I simply wrapped wire to secure the ends together to keep the new/smaller circle shapes..jpg) I also used 3 metal rings to use as the part of the structure to hang the crystals from. I used a total of 5 circles, 3 store bought and 2 made from reused parts from the old chandelier. (If your not reusing parts from a thrifted chandelier your going to purchase more of the metal rings to create your chandelier) I picked these metal rings up at Joanns fabrics. I imagine all craft stores would sell these. The large one which is 10" was only about $2 bucks, the 5" was about $1.50 and the 3" was .50cents. Your also needing some wire. I just pulled from my wire stash-- the nice silver wire pictured below is 26 gauge and the large messy bundle of wire I have no idea what gauge it is.... but it is slightly thicker than the 26 gauge. Now...lets start having some fun shall we?
I also used 3 metal rings to use as the part of the structure to hang the crystals from. I used a total of 5 circles, 3 store bought and 2 made from reused parts from the old chandelier. (If your not reusing parts from a thrifted chandelier your going to purchase more of the metal rings to create your chandelier) I picked these metal rings up at Joanns fabrics. I imagine all craft stores would sell these. The large one which is 10" was only about $2 bucks, the 5" was about $1.50 and the 3" was .50cents. Your also needing some wire. I just pulled from my wire stash-- the nice silver wire pictured below is 26 gauge and the large messy bundle of wire I have no idea what gauge it is.... but it is slightly thicker than the 26 gauge. Now...lets start having some fun shall we?.jpg) I've never made anything like this before, I'm just winging it, keep that in mind lol~ I used a wooden skewer and wrapped the thicker of the two wires around that... I pushed the wire close together on the skewer so that the loops would be the same size in diameter once I pulled it off.
I've never made anything like this before, I'm just winging it, keep that in mind lol~ I used a wooden skewer and wrapped the thicker of the two wires around that... I pushed the wire close together on the skewer so that the loops would be the same size in diameter once I pulled it off.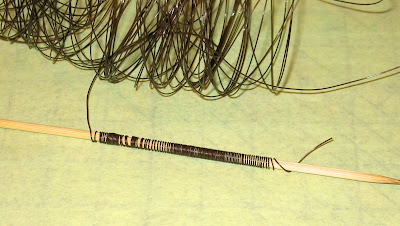.jpg) Next, I pulled off the wire from the skewer and started to flatten the wire so that it would be one long wavy piece of wire. I then attached the wire with tape to the round metal circle temporarily while working to attach it permanetly with wire.
Next, I pulled off the wire from the skewer and started to flatten the wire so that it would be one long wavy piece of wire. I then attached the wire with tape to the round metal circle temporarily while working to attach it permanetly with wire. .jpg) I used the 26 gauge wire to attach the thicker wire to the ring by going around the entire thing catching the wire next to the metal ring and just pulling it tight. Easy-peasy. When I had went around the ring back to where I started, I just wrapped the wire several times around to secure it.
I used the 26 gauge wire to attach the thicker wire to the ring by going around the entire thing catching the wire next to the metal ring and just pulling it tight. Easy-peasy. When I had went around the ring back to where I started, I just wrapped the wire several times around to secure it. .jpg) I did this to all 3 rings. Next, I painted the 3 rings with some gold metallic paint. I like the Krylon brand, it dries in 15 minutes or less~
I did this to all 3 rings. Next, I painted the 3 rings with some gold metallic paint. I like the Krylon brand, it dries in 15 minutes or less~.jpg) Here is the bottom of the chandelier I made (it is shown upside down so you can see the different heights I've created) To attach each circle to the larger circle I used wire that I simply wrapped around each ring trying my best to keep the circles centered each time I did this. The very bottom circle of my chandelier I was wanting to hang down a little bit more than the rest...so I just lengthened the wire and attached it about 2 inches lower than the rest (below, it is pictured upside down)
Here is the bottom of the chandelier I made (it is shown upside down so you can see the different heights I've created) To attach each circle to the larger circle I used wire that I simply wrapped around each ring trying my best to keep the circles centered each time I did this. The very bottom circle of my chandelier I was wanting to hang down a little bit more than the rest...so I just lengthened the wire and attached it about 2 inches lower than the rest (below, it is pictured upside down).jpg) Here is what is going to be the top of my chandelier. You can see the 4 pieces of wire that attaches the smaller inside circle to the larger outside circle... then I spray painted it all with the Krylon gold paint.
Here is what is going to be the top of my chandelier. You can see the 4 pieces of wire that attaches the smaller inside circle to the larger outside circle... then I spray painted it all with the Krylon gold paint. .jpg) I then divided the crystals from my thrifted chandelier into two piles. I had to stop and wash the crystals as they were pretty filthy! Once dried I had a fun time adding them to the rings to create my two new chandeliers. You can see in this photo below the top and bottom of the new chandelier starting to take form. I attached the top circle to the bottom circle only with the strands of crystals. This is being created so it will be able to collapse somewhat flat as these are only going to be used once a year for my yearly pirate party and then stored for the rest of the year! (the green wire is only being used temporarily while the chandelier is being created)
I then divided the crystals from my thrifted chandelier into two piles. I had to stop and wash the crystals as they were pretty filthy! Once dried I had a fun time adding them to the rings to create my two new chandeliers. You can see in this photo below the top and bottom of the new chandelier starting to take form. I attached the top circle to the bottom circle only with the strands of crystals. This is being created so it will be able to collapse somewhat flat as these are only going to be used once a year for my yearly pirate party and then stored for the rest of the year! (the green wire is only being used temporarily while the chandelier is being created)  I kept adding crystals spacing them somewhat evenly as the wire loops would allow me to lol.... then I added some crystals into the reused predrilled metal pieces that I bent into smaller circles. Thats it....easy-peasy! Here is a close up photo showing the chandelier all finished.
.jpg)
then I took the brass frame outside and started pounding apart the rings with the predrilled holes in them that I wanted to reuse on my two new chandeliers. Here are those parts shown below. I cut open the old metal circles so that I could make them smaller. I simply wrapped wire to secure the ends together to keep the new/smaller circle shapes.I also used 3 metal rings to use as the part of the structure to hang the crystals from. I used a total of 5 circles, 3 store bought and 2 made from reused parts from the old chandelier. (If your not reusing parts from a thrifted chandelier your going to purchase more of the metal rings to create your chandelier) I picked these metal rings up at Joanns fabrics. I imagine all craft stores would sell these. The large one which is 10" was only about $2 bucks, the 5" was about $1.50 and the 3" was .50cents. Your also needing some wire. I just pulled from my wire stash-- the nice silver wire pictured below is 26 gauge and the large messy bundle of wire I have no idea what gauge it is.... but it is slightly thicker than the 26 gauge. Now...lets start having some fun shall we?I've never made anything like this before, I'm just winging it, keep that in mind lol~ I used a wooden skewer and wrapped the thicker of the two wires around that... I pushed the wire close together on the skewer so that the loops would be the same size in diameter once I pulled it off.Next, I pulled off the wire from the skewer and started to flatten the wire so that it would be one long wavy piece of wire. I then attached the wire with tape to the round metal circle temporarily while working to attach it permanetly with wire. I used the 26 gauge wire to attach the thicker wire to the ring by going around the entire thing catching the wire next to the metal ring and just pulling it tight. Easy-peasy. When I had went around the ring back to where I started, I just wrapped the wire several times around to secure it. I did this to all 3 rings. Next, I painted the 3 rings with some gold metallic paint. I like the Krylon brand, it dries in 15 minutes or less~Here is the bottom of the chandelier I made (it is shown upside down so you can see the different heights I've created) To attach each circle to the larger circle I used wire that I simply wrapped around each ring trying my best to keep the circles centered each time I did this. The very bottom circle of my chandelier I was wanting to hang down a little bit more than the rest...so I just lengthened the wire and attached it about 2 inches lower than the rest (below, it is pictured upside down)Here is what is going to be the top of my chandelier. You can see the 4 pieces of wire that attaches the smaller inside circle to the larger outside circle... then I spray painted it all with the Krylon gold paint. I then divided the crystals from my thrifted chandelier into two piles. I had to stop and wash the crystals as they were pretty filthy! Once dried I had a fun time adding them to the rings to create my two new chandeliers. You can see in this photo below the top and bottom of the new chandelier starting to take form. I attached the top circle to the bottom circle only with the strands of crystals. This is being created so it will be able to collapse somewhat flat as these are only going to be used once a year for my yearly pirate party and then stored for the rest of the year! (the green wire is only being used temporarily while the chandelier is being created) I kept adding crystals spacing them somewhat evenly as the wire loops would allow me to lol.... then I added some crystals into the reused predrilled metal pieces that I bent into smaller circles. Thats it....easy-peasy! Here is a close up photo showing the chandelier all finished.Here is another view....jpg)
I am going to add this light fixture (below) that is normally used in paper lanterns for the light source for my two new chandeliers. .jpg) Thats it...I hope you try it. Remember, you could use those beaded garlands as well!
Thats it...I hope you try it. Remember, you could use those beaded garlands as well!
Thats it...I hope you try it. Remember, you could use those beaded garlands as well!+(2).jpg) and here is the after.
and here is the after..jpg) Here is the
Here is the .jpg) Here is the after....
Here is the after.....jpg) I've written two tutorials (with photos) on how to do the
I've written two tutorials (with photos) on how to do the .jpg) and one on how I made over the
and one on how I made over the  If you've linked to my blog through "There is no place like Home" and wish to have more of a lookie-lou you can click
 .jpg) The supplies: a map, some glue, scraps of paper, scissors & paint. Also, if you wanting to make an embossing on the inside lid your going to be needing a stencil and some joint compound-- oh and some spray adhesive.
The supplies: a map, some glue, scraps of paper, scissors & paint. Also, if you wanting to make an embossing on the inside lid your going to be needing a stencil and some joint compound-- oh and some spray adhesive..jpg) With the inside bare, I made a paper template for the sides, bottom and top of the trunk-- cutting a smidge bigger on each piece. It is so much easier to cut away extra than to have to recut a whole new piece if its to little. Once all the pieces were cut I dry fitted the pieces just to make sure everything was cut just right.... then I got out my map paper. The map paper I am using is actually from a roll of wall paper that I picked up from a thrift store for .95cents. You can use a regular map that you find in your glove box as well.
With the inside bare, I made a paper template for the sides, bottom and top of the trunk-- cutting a smidge bigger on each piece. It is so much easier to cut away extra than to have to recut a whole new piece if its to little. Once all the pieces were cut I dry fitted the pieces just to make sure everything was cut just right.... then I got out my map paper. The map paper I am using is actually from a roll of wall paper that I picked up from a thrift store for .95cents. You can use a regular map that you find in your glove box as well.  Lay your paper templates of each piece onto the map, keeping in mind that your wanting your cut map pieces to be "right reading" not upside down or cock-eyed. (unless thats the look your wanting) Once all your map pieces are cut...just glue them into place inside your chest. You can use regular cheapie glue or use Modge podge. I always have to trim away my paper as I cut everything larger...so to get a super clean edge on your map -- let it dry-- then trim away any excess paper with a razor. (I think this is why I always have so many projects that I work on at one time, I don't like to WAIT) Anywho...Now, the fun part. Distressing and aging the inside of your pirate chest. I use several different colors of brown and black paint to age the seams and edges of the trunk & lid. I apply the black to the very seam of each inside piece and then the brown fades out into the trunk getting lighter and lighter~
.jpg) Once it is looking aged, the next step is to add some depth to the trunk. (this is in keeping with my philosophe of "more is better") I of course pulled out my trusty joint compound! I adhered a small stencil to the lid with spray adhesive (the lid is bowed and wouldn't let the stencil lay flat) I applied the joint compound to make the embossing. I turned the trunk over to make it easier to work on.
Once it is looking aged, the next step is to add some depth to the trunk. (this is in keeping with my philosophe of "more is better") I of course pulled out my trusty joint compound! I adhered a small stencil to the lid with spray adhesive (the lid is bowed and wouldn't let the stencil lay flat) I applied the joint compound to make the embossing. I turned the trunk over to make it easier to work on. .jpg) Next, I globbed a bunch of joint compound onto the stencil. Seeing how it is a curved lid, I couldn't use a putty knife...so I used my finger to spread out the joint compound evenly over the stencil.
Next, I globbed a bunch of joint compound onto the stencil. Seeing how it is a curved lid, I couldn't use a putty knife...so I used my finger to spread out the joint compound evenly over the stencil. .jpg) Next, I pulled up the stencil. At this stage I used a pencil to add more detail to the embossed area. I just pushed & pulled the joint compound to fill in some areas... and pressed deeper to take some of the joint compound away from other areas. Here is a photo of the skull with the stencil removed and after I had worked my pencil magic on it lol.
Next, I pulled up the stencil. At this stage I used a pencil to add more detail to the embossed area. I just pushed & pulled the joint compound to fill in some areas... and pressed deeper to take some of the joint compound away from other areas. Here is a photo of the skull with the stencil removed and after I had worked my pencil magic on it lol..jpg) Once dry, I went over the raised area with a base coat of brown paint.
Once dry, I went over the raised area with a base coat of brown paint. .jpg) Then I just kept adding browns & some black until I liked it. Once it was all dry, I dipped my finger tip in a light brown paint and went over the raised skull design to give it more depth. Now it looks like its a piece of carved wood on the lid.
Then I just kept adding browns & some black until I liked it. Once it was all dry, I dipped my finger tip in a light brown paint and went over the raised skull design to give it more depth. Now it looks like its a piece of carved wood on the lid.  I then measured and cut a piece of burlap fabric to fit inside the lid of my pirate chest. I used a pin to pull up some of the threads to make it look old and worn. I then used my sewing machine and zig-zagged around every edge to keep it from fraying in the future once I attached it to the trunk.
 .jpg) Next, I used some watered down paint straight onto the fabric to give it a dirty look...
Next, I used some watered down paint straight onto the fabric to give it a dirty look....jpg) Once that was dried, I used hot glue and glued it to the bottom of the lid to hold extra special stuff. Fill with some of your pirate look and enjoy!
Once that was dried, I used hot glue and glued it to the bottom of the lid to hold extra special stuff. Fill with some of your pirate look and enjoy!.jpg) Taaaaaaaa daaaaaa easy peasy!
Taaaaaaaa daaaaaa easy peasy!
.jpg) Faux leather tutorial~
Faux leather tutorial~.jpg) Firstly, I spray painted the box as I couldn't stand looking at it the way it was any longer. You do not have to paint or seal the object your going to give the faux leather treatment too... this was just a personal choice. Now lets get started!
Firstly, I spray painted the box as I couldn't stand looking at it the way it was any longer. You do not have to paint or seal the object your going to give the faux leather treatment too... this was just a personal choice. Now lets get started!  Dab the area with your fingers and then take a brayer and run it across a few times to smooth out any air bubbles. If you have applied to much glue the tissue paper will start to stick to your fingers & brayer and tear-- if this happens, tear a piece of tissue paper making sure all edges are torn (so that there is no straight edges) and patch the area that was torn. Once your object is covered, let it dry.
  Here is the top of the box finished, I folded and glued the paper over each edge and made mitered edges at the corners and cut away the excess tissue paper.
 .jpg) 3.) Continue covering all areas in the same manor until everything is covered that your wanting covered. Let dry~
3.) Continue covering all areas in the same manor until everything is covered that your wanting covered. Let dry~ 4.) Re-apply another layer of glue same as before only this time lay a piece of un-crumpled tissue over the area. Once your object is covered allow it to dry thoroughly, trim edges with a razor to get a nice clean edge. Go over the entire object with a layer of Modge Podge or glue/water mixture. Here is my box covered twice with tissue paper. The first layer was crumpled, the second was a smooth sheet of tissue paper.
 .jpg) Now, comes the fun part. Painting! I just grabbed several different half empty bottles of brown paint and started painting the box. You have to keep in mind that you are rewetting this tissue paper - even though it has modge podge on it...so it might tear, so be gentle with your brush strokes and let it dry between coats. I am a firm believer in "more is better" so I just kept adding more & more paint to get it to look like a dirty old leather pirate chest that has been around for ages! The first "layer" of paint consisted of 2 different colors of brown paint and some watered down black paint that I patted on around the edges with my finger tip. The second layer I used 3 different brown paints to add depth to the chest. I darkened around all the edges where you would expect to see dirt-- I hear those pirates were a dirty bunch of scoundrals~ Once your happy with your paint and it has dried, apply another coat of Modge Podge or spray varnish to really make the faux leather pop.
Now, comes the fun part. Painting! I just grabbed several different half empty bottles of brown paint and started painting the box. You have to keep in mind that you are rewetting this tissue paper - even though it has modge podge on it...so it might tear, so be gentle with your brush strokes and let it dry between coats. I am a firm believer in "more is better" so I just kept adding more & more paint to get it to look like a dirty old leather pirate chest that has been around for ages! The first "layer" of paint consisted of 2 different colors of brown paint and some watered down black paint that I patted on around the edges with my finger tip. The second layer I used 3 different brown paints to add depth to the chest. I darkened around all the edges where you would expect to see dirt-- I hear those pirates were a dirty bunch of scoundrals~ Once your happy with your paint and it has dried, apply another coat of Modge Podge or spray varnish to really make the faux leather pop..jpg) I puchased two door handles (Home Depot $1.27 each) that have a look of forged metal....and just screwed those into the sides of the chest to help carry all the heavy loot.
I puchased two door handles (Home Depot $1.27 each) that have a look of forged metal....and just screwed those into the sides of the chest to help carry all the heavy loot. .jpg)
.jpg) Well, I am pretty darn happy with how this turned out. But... I can't leave well enough alone! Even though the inside is finished in a beautiful black velvet I'm eager to start making over the inside to match the outside!
Well, I am pretty darn happy with how this turned out. But... I can't leave well enough alone! Even though the inside is finished in a beautiful black velvet I'm eager to start making over the inside to match the outside! +(2).jpg) Here is the AFTER photo:
Here is the AFTER photo: .jpg) *My very first tutorial* Woot-woot~
*My very first tutorial* Woot-woot~ .jpg) Next, if your centering your design like I did-- find the center and mark the spot with a pencil to help you align your stencil... next, just tape your stencil down. (yes, that is paint on my stencil, I do not wash the paint off of my stencils)
Next, if your centering your design like I did-- find the center and mark the spot with a pencil to help you align your stencil... next, just tape your stencil down. (yes, that is paint on my stencil, I do not wash the paint off of my stencils) Now, comes the fun part. You just take some of your joint compound and spread a nice coat of it on top of your stencil. No worries, don't stress-- it does end up looking fabulous-- promise! While this is setting up a little, I draw the center on the next drawer...so I would say about 2 minutes max. That seemed to work fine for me~
 .jpg) Next, you just pull up your stencil. Keep a good grip on it as its going to be heavy with the excess joint compound on it. (Place the stencil onto newspaper or scrap paper so you don't get anything on your work surface)
Next, you just pull up your stencil. Keep a good grip on it as its going to be heavy with the excess joint compound on it. (Place the stencil onto newspaper or scrap paper so you don't get anything on your work surface) .jpg) If for any reason your not happy with the results, simply wipe off the joint compound while it is still wet, with a wet paper towel, and start over! (I had to wipe off a finished drawer as I noticed I had applied the stencil upside down lol) At this point you want to tap down any large peaks or wipe away any mistakes or globs.
If for any reason your not happy with the results, simply wipe off the joint compound while it is still wet, with a wet paper towel, and start over! (I had to wipe off a finished drawer as I noticed I had applied the stencil upside down lol) At this point you want to tap down any large peaks or wipe away any mistakes or globs. .jpg) Again, no biggy-- enjoy the process~ When your ready for the next drawer, simply pick up your joint compound ladden stencil and reapply to a new drawer front. You do not have to clean your stencil between each drawer...unless your extremely messy and it is necessary! Repeat this process until all the drawers are completed. Let the newly appliqued pieces dry for 5 hours or more....until everything is dry to the touch. At this point you can either use your nail or an razor blade to cut off any bumpy bits --if you want to. Don't sand it or it will crumble completly off. To clean your stencil, simply scrape off remaining joint compound and put back into the container. Try to wipe off as much of the compound as possible (I use toilet paper, it is softer and less harsh on the stencil than paper towels) and toss the tissue into the trash. Just rinse the stencil under hot water while rubbing the stencil gently and the joint compound washes away.
Again, no biggy-- enjoy the process~ When your ready for the next drawer, simply pick up your joint compound ladden stencil and reapply to a new drawer front. You do not have to clean your stencil between each drawer...unless your extremely messy and it is necessary! Repeat this process until all the drawers are completed. Let the newly appliqued pieces dry for 5 hours or more....until everything is dry to the touch. At this point you can either use your nail or an razor blade to cut off any bumpy bits --if you want to. Don't sand it or it will crumble completly off. To clean your stencil, simply scrape off remaining joint compound and put back into the container. Try to wipe off as much of the compound as possible (I use toilet paper, it is softer and less harsh on the stencil than paper towels) and toss the tissue into the trash. Just rinse the stencil under hot water while rubbing the stencil gently and the joint compound washes away. .jpg) Next, I painted over the raised area with the same latex house paint that the drawers had been painted with. I put two coats on each drawer, once the paint has dried comes the super fun part! Antiquing!
Next, I painted over the raised area with the same latex house paint that the drawers had been painted with. I put two coats on each drawer, once the paint has dried comes the super fun part! Antiquing! .jpg) I used a nutmeg brown paint watered down and applied randomly with a large brush. I then used my fingers to rub the watered down paint all over the piece. I had to rewet my fingers a lot to keep the paint moving in an even coat. If it sets up and looks awful-- just rewet the area and run your fingers/hand across it until you like the looks of it.
I used a nutmeg brown paint watered down and applied randomly with a large brush. I then used my fingers to rub the watered down paint all over the piece. I had to rewet my fingers a lot to keep the paint moving in an even coat. If it sets up and looks awful-- just rewet the area and run your fingers/hand across it until you like the looks of it..jpg) Looks good huh? If at a later date I feel I want it to be lighter, I'll just wet it and rub more off.
Looks good huh? If at a later date I feel I want it to be lighter, I'll just wet it and rub more off. .jpg) Lastly, just take a brown ink pad.... I used a color called "chocolate chip" and rub it along the edges and raised areas of your piece. This is when the piece really comes to life.
Lastly, just take a brown ink pad.... I used a color called "chocolate chip" and rub it along the edges and raised areas of your piece. This is when the piece really comes to life. .jpg) Here is my one dollar dresser all finished with its new knobs and freshly appliqued painted surfaces ready to be used once again! (I bought a bag of 24 of these knobs for $2 bucks) Here is a close up. Doesn't it look neat and super old? Not to bad for a dollar dresser~
Here is my one dollar dresser all finished with its new knobs and freshly appliqued painted surfaces ready to be used once again! (I bought a bag of 24 of these knobs for $2 bucks) Here is a close up. Doesn't it look neat and super old? Not to bad for a dollar dresser~.jpg)


